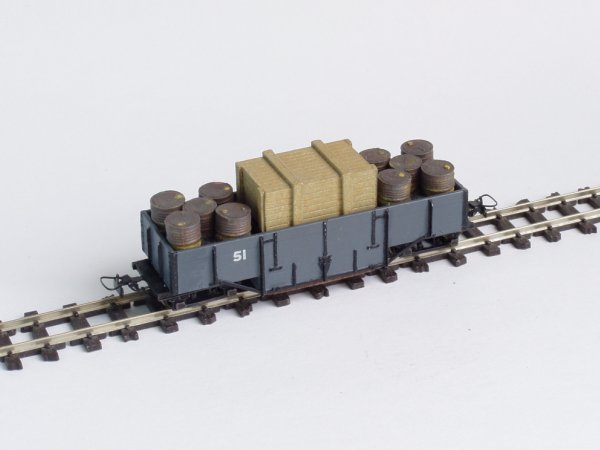
After reading John Maton’s article ‘A Simple Track Cleaner’ in the April 1998 009 News, I decided to build one for my (at that time!) planned Lynton & Barnstaple layout. The track cleaner is a pad of hardboard sliding over the track with its rough side down. In the end I built the SBL layout and the Nine Lines L&B bogie van proved far too long for the tight curves on the SBL line (163mm radius, around 6½"). Luckily the Parkside Dundas WD bogie wagon ran around the curves without trouble, and encouraged by John’s remark that ‘any similar kit could be used’, I chose the DM19 kit (the bogie well wagon). The scrubbing contraption is nicely hidden by the well which is an additional advantage.
I followed the kit instructions up to step 6, replacing the vertical floor parts ‘B’ by two pieces of 1mm styrene, each 18.8 x 12mm, and discarding the well floor (part ‘C’). What now remained was an aperture of 28 x 18.8mm for the scrubber box. I made the latter from the same green styrene sheet but about half a millimetre smaller than the aperture so it could easily move up and down. The box was made 12.7mm high and a square of hardboard was fixed underneath using double-sided adhesive tape. For ballast I cut a number of squares of brass, each 25.5 x 16mm, fitted inside the box. I quickly found out that in order to keep the wagon on the track, I needed ballast over the bogies as well. Four squares of brass, each 16 x 16mm in size, with a total weight of about 8 grams, proved to be satisfactory. I glued these in a box 18.4 x 18.4mm and 6mm high, masked by a load of 5 oil drums on top, each cut in half. The scrubber box was camouflaged by a large crate made of Evergreen planked sheet and strip. The crate exactly fits the top of the scrubber box. The wagon was fitted with Greenwich couplers and is regularly hauled along the track, cleaning the track in the process. During the Rail2004 show the track was burnished to such a degree that the locomotive eventually started to slip. Reducing the weight in the box from 8 to 4 grams proved to be the solution.
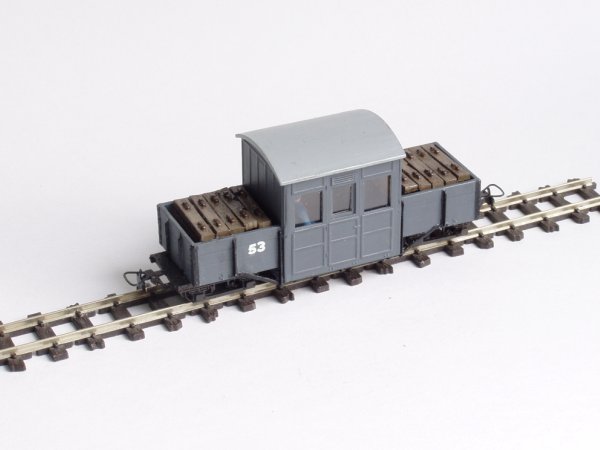
SBL works vehicle no. 53 – the ‘palanquin’.
Inspired by the Bala Lake Railway’s Catoflat I used another Parkside Dundas DM19 to create the SBL’s ‘Palanquin’ – a bogie wagon with passenger accommodation in the centre. The well area of each side of the bogie wagon was filed flat and half of the side of a DM29 two-compartment four-wheel carriage glued against it. The ends of the DM29 kit were tailored to size and fitted between the sides of the well wagon instead of the vertical floor parts ‘B’. The panelling was completed using microstrip and some weight was added using 1mm brass squares for the vehicle’s floor. Glazing was added and two railway workers sitting on styrene seats, and finally half of the DM29’s roof was fitted. The ballast weights over the bogies were hidden from view by sleepers. Thus the PW gang has been provided with a travelling shelter to have their tea in…
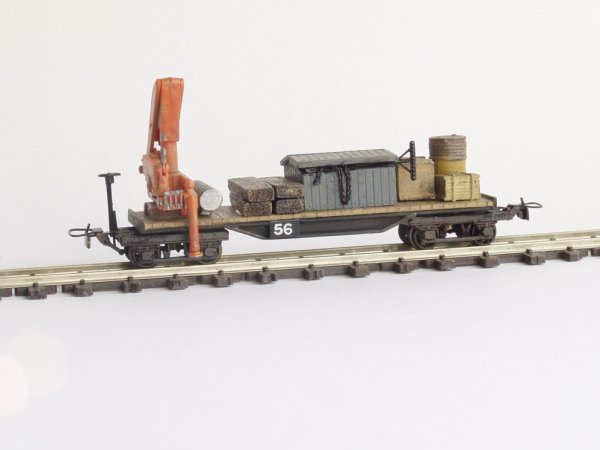
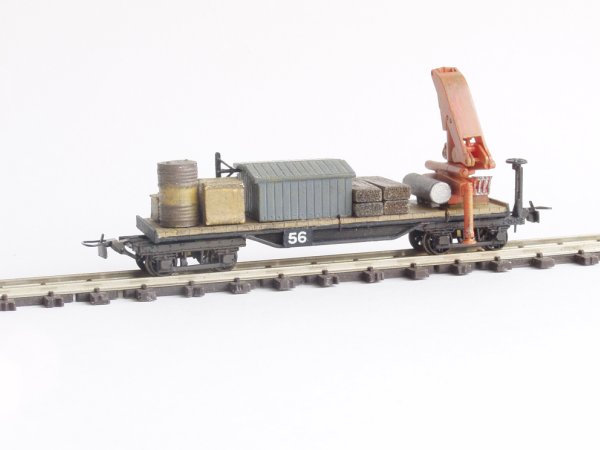
SBL works vehicle no. 56 – the works crane
When I built the ballast wagons nos. 52 (DM30) and 55 (DM18) I replaced the plastic floor by 1mm brass sheet to add some weight. One of the remaining plastic floors, together with two DM20 bogies, was the starting point of the travelling crane. I glued a plastic U section along the sides, cut away along the bottom to allow the bogies to move freely. Plastic L section was fitted to the ends, and under the centre of the wagon again two squares of brass (28 x 14mm) were glued. At one end I fitted a HIAB hydraulic crane by Roco. A storage box in the centre was made using Evergreen V groove sheet (no. 4060). Half of this is used for tools, the other half contains batteries to power the crane. As battery power has proven inefficient in use, a diesel engine will be fitted in future. Sleepers to support the crane legs, a few crates and an oil drum were added as the final touch.
2 - Locomotives and the inspection railcar
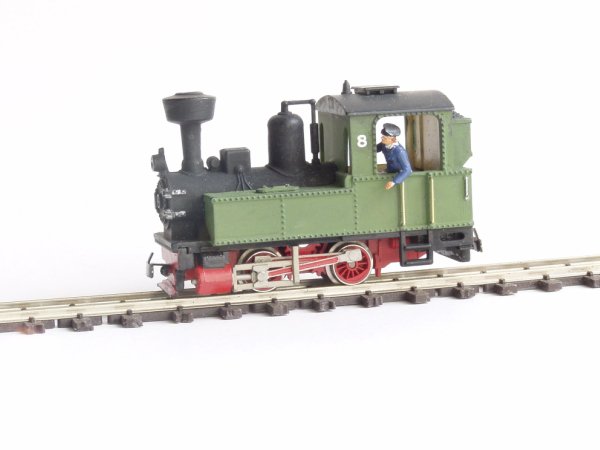
Steam loco no.8 - a simple conversion
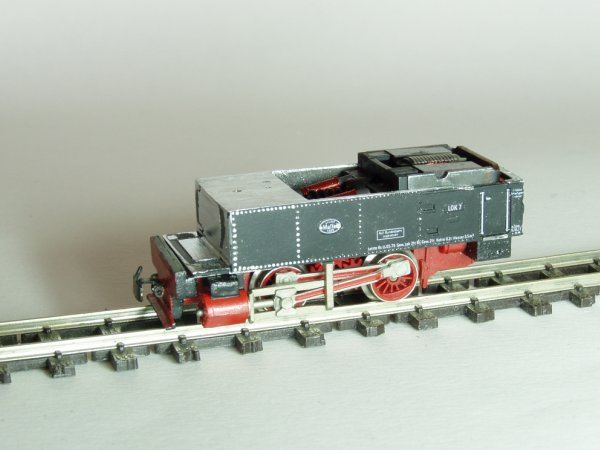
No. 8 is a recent addition to the SBL motive power roster. At a swapmeet a long time ago I obtained a second-hand Roco 0-6-0 steam locomotive that looked fine as long as it was kept in the display case, but was a virtual non-performer due to the poor quality of the original Atlas mechanism.
After using a Fleischmann 0-4-0 chassis to power a loco based on a Peco James, I thought it would be a good idea to use the same chassis to turn the useless Roco model into a working locomotive. This proved to be a simple operation. I cut down the Fleischmann body as shown in the photo, after which it fitted the plastic Roco body shell exactly. In order to do so, I cut the boiler top and the cab off the Fleischmann body and used a file to remove the tank top detail. The smokebox protrudes beyond the tank front and has to be removed as well. The footplate of the Fleischmann body has to stay in place however. I filed the tank sides flat as well.
The cut down body can now be glued inside the Roco body, and it is a good idea to fill any remaining space with lead sheet. A new front buffer beam was glued to the front of the chassis, and the rear beam to the Roco body. Due to the space taken up by the motor, the driver had to be cut in half. What remained was glued on a square of plastic inside the cab, right above the motor. The cast handrails next to the cab doors were replaced by 0.45mm straight brass wire by Alan Gibson. I think the end result is rather more like a steam loco than the original Roco model.
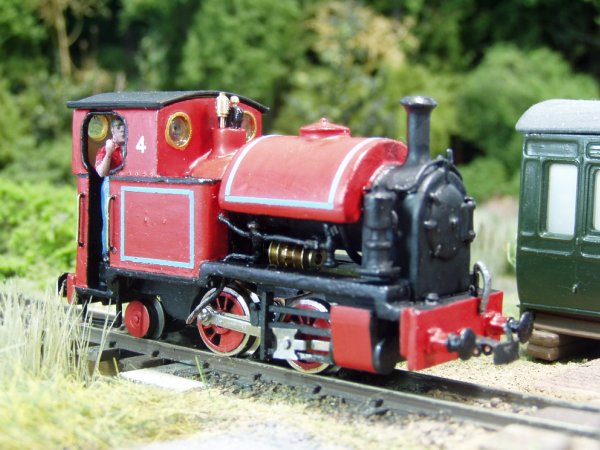
More steam locomotives - Chivers RC34 'Edward Thomas' kit made up in 'Peter Sam' livery, using the Bachmann 0-4-0 chassis:
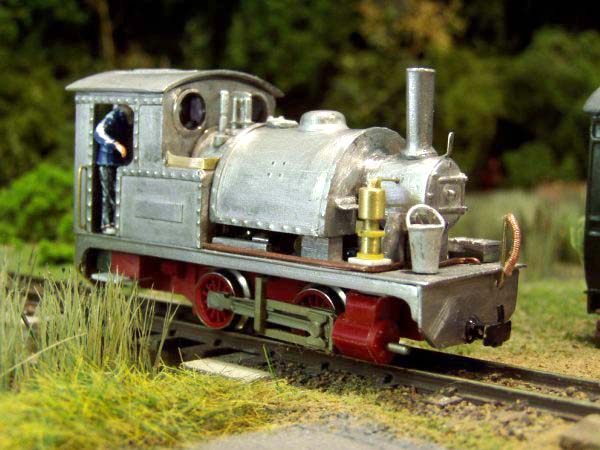
The Peco 'James' kit made up with a Fleischmann 0-4-0 chassis:
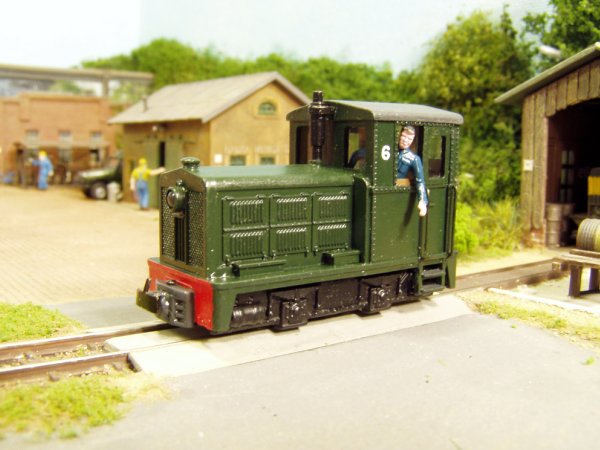
Diesel locomotive no.6
At my age one usually has accumulated lots of stuff dating from a long time ago. Like that Roco diesel which, like the steam loco which I rebuilt at another time, I found at a swapmeet many years ago and kept in the display case because of the performance (or the lack of it) of the old Atlas chassis. When I put an Ibertren chassis in the RC35 kit of Sir Haydn I checked whether the same chassis would fit under the Roco diesel body. The motor didn’t fit by a small margin, which is very close to fitting just by a small margin… so I took up the challenge to shoehorn one in. The advantage would be that the wheels would be exactly in the correct position and I could remove that strange looking bulge at the rear of the cab.
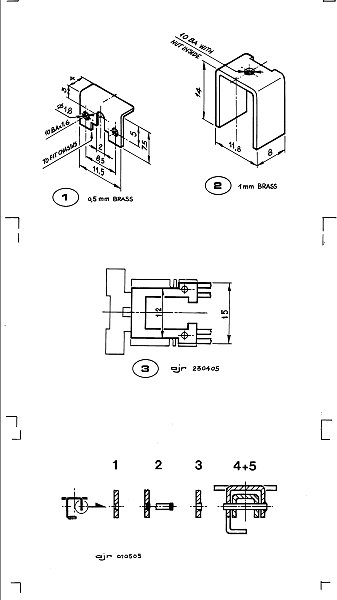
I started the job by fitting the motor in the cab, scraping and filing a piece off the inside of the shell at the join between the cab and the bonnet, at a 45 degree angle. Then I tackled the chassis, leaving the pickup wiper base for later. I made an angle bracket out of 0.5mm brass (detail drawing 1) and drilled two holes at similar spacing in the motor support on the chassis. These were tapped 10BA. Both the bracket and the motor support were made 11.5mm wide. The couplings and motion had been removed from the chassis at an earlier stage. Now the buffers and steps were cut off the chassis and the remains filed flat. The front buffer beam was narrowed to 14mm so the outside frames could be glued flat against it.
Next I made a U-shaped brass bracket to fit inside the bonnet so the shell could be fixed to the chassis (detail drawing 2). I drilled a 1.8mm hole through the chassis block and the bracket before fitting the latter into the bonnet and soldered a nut to the bracket before gluing it in place. In hindsight this proved to have been unnecessary as the motor is such a tight fit inside the body that it will stay in place without the bracket.
Next I cut the upper contacts off the pickup wiper unit. The cylinders which are integral with this unit were cut off just in front of the fixing clip and the forward part of the unit was narrowed to 12mm (detail drawing 3). The rear part which includes the wiper fixtures was narrowed to 15mm using a file. In order to fit this inside the body shell I removed part of the footplate from the shell at the spot where it used to be clipped to the old Atlas chassis. I covered the resulting apertures each with a styrene box similar to that at the front of the footplate. Now I removed the ‘bulge’ from the rear of the cab and re-fitted the rear of the bulge into the ensuing hole to preserve the detail. The buffer beam now fits neatly against the steps. Finally, I added brass sheet to the remaining space inside the body shell to give it some weight.
On the outside frame overlays the bearing and spring detail for the former centre wheels was removed and a small piece taken out so everything would fit in its correct place again. A 14mm wide bracket was made of 0.3mm brass sheet to support the glue join in the centre of the frame overlays.
The Atlas chassis had left huge spaces in each buffer beam in the spot where I planned to fit the Greenwich couplers. How to tackle this problem? Hunting through the bits box I found the axle bearing detail of a Knightwing diesel kit. For some reason this remarkably looks like narrow gauge coupling castings of the type usually found on industrial diesels. Two of these were glued in the ends of the body shell and the Greenwich coupler hooks were fitted into these castings at the correct height from the track.
Finally, I removed the roof detail from the body (because of the low headroom profile of the SBL layout) and shortened the exhaust pipe. In order to improve the locomotive’s looks, the front windows were enlarged, the cab doors extended upwards and half a driver added, leaning out of what we shall term a sliding cab window…
The Inspector's railcar
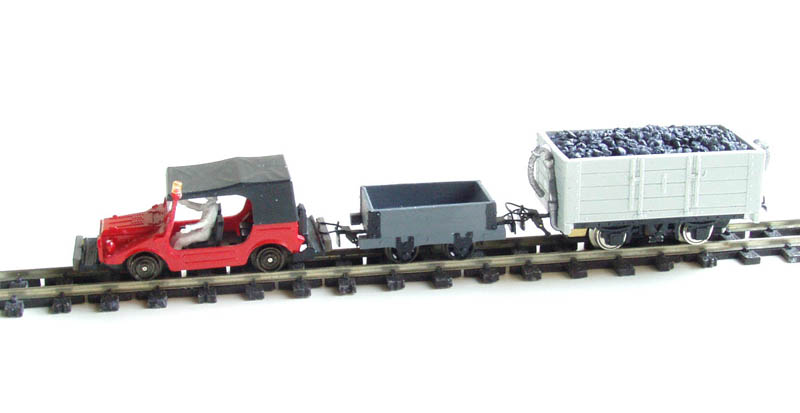
From a Herpa 1960s DKW Munga 4-wheel drive vehicle, a Corris open and a Lynton & Barnstaple open by Nine Lines I made up the Inspector's railcar and trainers. The Munga was fitted with Roco narrow gauge wheels. The Corris open is really enough for the Munga to pull, but I wanted to power it, so a ghost wagon had to appear.
The Inspector's railcar with the ghost wagon:
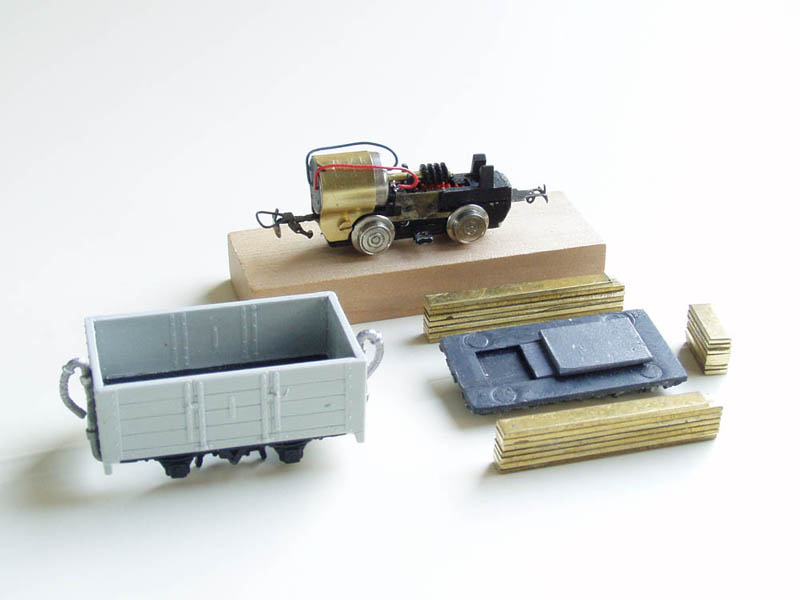
The ghost wagon before assembly:
Some time ago I came across an Ibertren Köf without a motor, so I thought it might come in handy. The next thing was one of Nigel Lawton's Bachmann re-motoring kits, which includes a 10 x 12mm coreless motor. Together with a Fleischmann worm and a specially made bracket (see diagram) it all fitted into the L&B open. The entire set still needs painting…
A real DKW Munga:
The model on the layout:
3 - The fire-fighting train and other works vehicles
In the August 2005 009 News I wrote a few words about the Permanent Way bogie vehicles of my SBL, numbered in the '50' range.
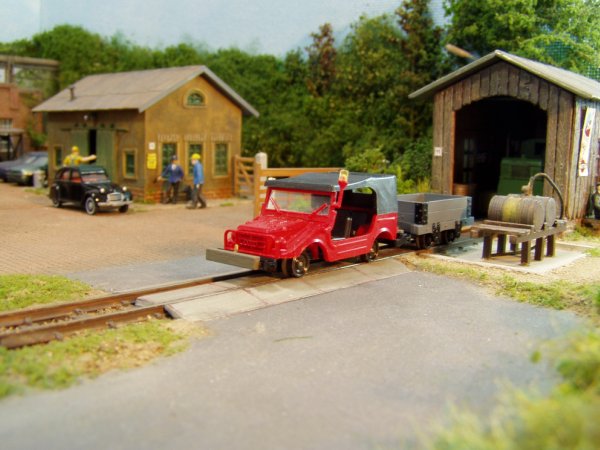
In consequence of the SBL being a museum railway operating steam locomotives through woodland, we needed rail-mounted fire-fighting equipment. To realise this, good use was made of old Arnold tipper underframes and thus, the '60' series of rolling stock materialised.
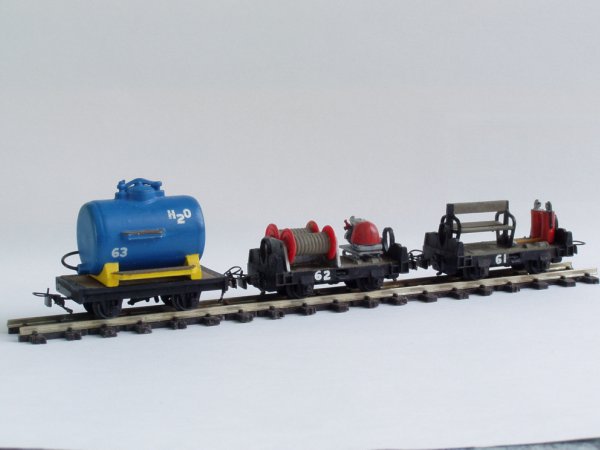
No. 61 - the crew truck
In order to provide transport for the fire-fighting crew, a seat from a Jouef Decauville carriage was placed on an Arnold tipper chassis. For immediate response to small fires it is fitted with two shovels and two fire extinguishers.
No. 62 - the pump truck
The next underframe was fitted with two hose reels and a motor pump. The reels came from a Herpa fire-fighting detail set and are kept in place by a few scraps of styrene sheet. The motor pump came from a Roco fire engine.
Nr. 63 - the water wagon
The water wagon takes care of the water supply when fighting a forest fire. I fitted an Egger milk tank on a Parkside Dundas DM5 chassis. Luckily this piece of rolling stock is normally used to water the steam locomotives rather than assist with firefighting.
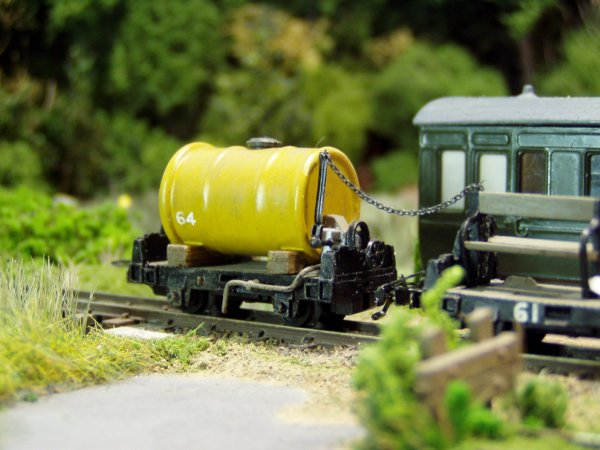
No. 64 - the weedkiller wagon
Despite the excellent work done by the permanent way gang, after a short while the need arose to remove the weeds encroaching on the track. So I built a weedkiller wagon.
Again, I used one of the refurbished Arnold tipper underframes. The tank holding the herbicide fluid comes from a cheap Chinese toy set. My youngest grandchild now plays with the race car that also came with the set. The valve in the spray pipe is a scrap piece of plastic, and the lever controlling the flow is part of an old record player needle (who remembers these?). The chain came from Pete McParlin. The crew truck from the fire-fighting train is an indispensable item to operate the weedkiller train.
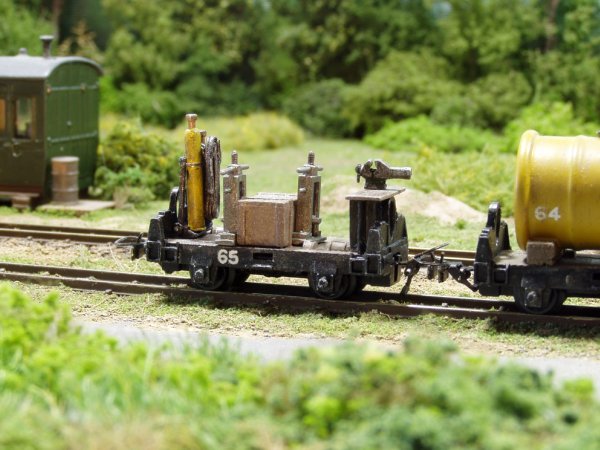
No. 65 - the welding and acetylene cutting truck
For emergency repairs in case of derailments and other accidents out on the line, an Arnold tipper underframe was fitted with appropriate tools. The welding and cutting equipment comes from a Noch detail set. The workbench was made from styrene and the vice came from a Wills workshop set. The centre of the wagon is occupied by a box for small tools, which is flanked by two screw jacks from a Cooper Craft tool set. Again, the crew truck from the firefighting train is indispensable.
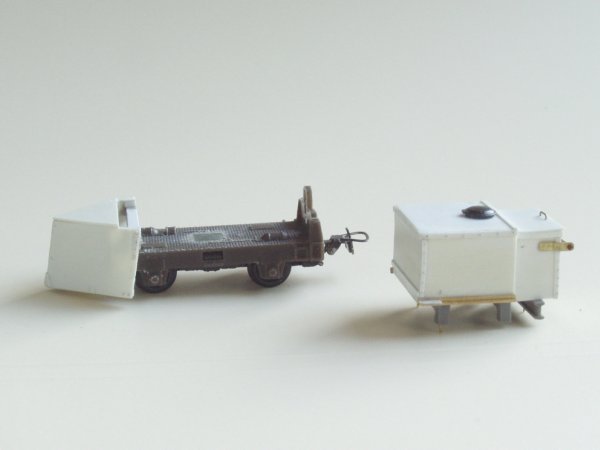
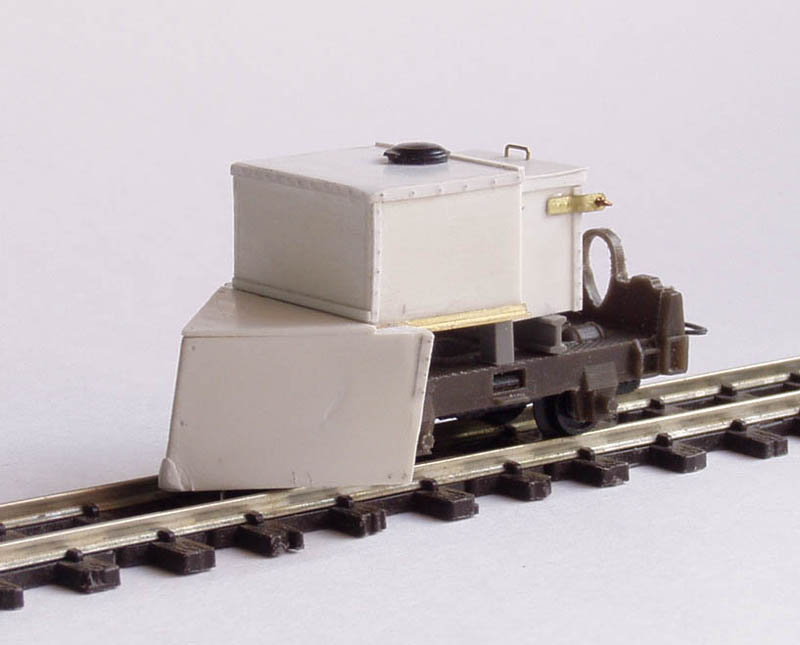
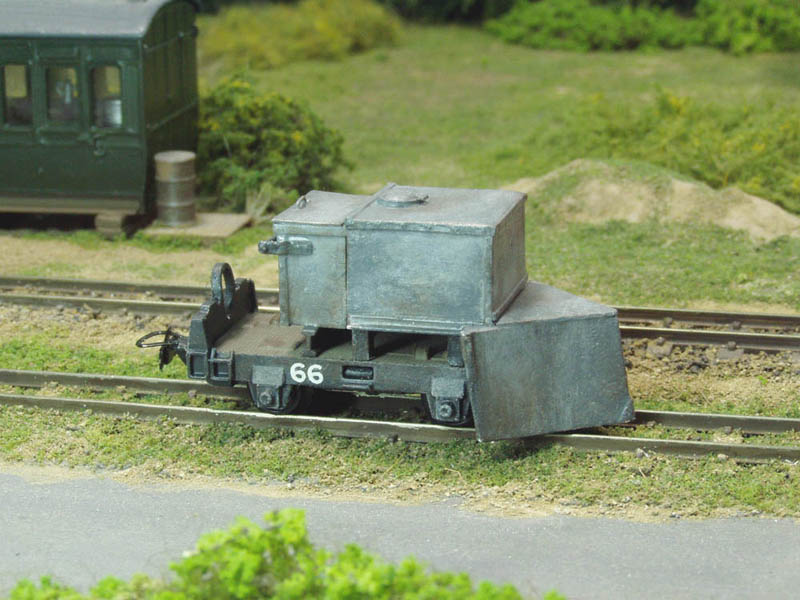
No. 66 - the snowplough, a.k.a. the ice cream cart
Over the summer holidays, the SBL volunteers enthusiastically cleared up the mess in a forgotten corner of the workshop. Initially they thought an ice cream vendor's pushbike was hidden under the pile of rubbish, but when they pulled it clear it proved to be quite heavy. It had flanged wheels and a strange wedge-shaped front end.
When they finally put the thing on the track, at last everyone understood the purpose of the mysterious object: it was a true snowplough. After the last cold winter (how long is THAT ago??) it must have been put away and forgotten. As everyone at first took it for an ice cream cart, that was what it was referred to subsequently.
Fred, the works foreman, had been as surprised as everybody else and when realisation dawned, he got a brainwave. He had seen the thing before, but where? After returning home he found out when he re-read a book he recently ordered from England, entitled "Industrial Narrow Gauge Stock and Trackwork". And here, on page 43, he found the twin of the ice cream cart, and it was even a bit smaller than theirs.
Well - from here we'll let reason take over. I found the prototype for the snowplough in the Plateway Press book mentioned above (by Sydney A. Leleux, ISBN 1 871980 53 4). Several other pieces of rolling stock were inspired by the book, like the welding truck (SBL No. 65), a prototype of which is shown on page 45. Despite the fact I'm working on a new project, the miniature snowplough of page 43 kept coming up in my head.
Another Arnold tipper chassis was unearthed and subjected to some experimentation with a card template to get the shape of the wedge and the water tank right. Then the model was built in styrene sheet and glued to the front of the chassis, after cutting this to shape. The ballast tank was filled with tiny bits of brass sheet instead of water. The box behind it which may have been intended to contain brine, was glued against the tank and fitted with a lid with a handle.
I cut a few strips of 0.3mm styrene which I embossed with rivets from behind and glued along the edges of the model. On its rear a Greenwich coupler was attached and after painting I gave it its SBL number 66. The painting took a while however as I was distracted by Mick Thornton's article on kitbashing freelance coaches from Ratio sides…
No. 104 - a 'flying bench' carriage
This vehicle, one of the more primitive passenger-carrying vehicles of the Preservation Society, is based on a similar vehicle on the preserved railway of Valkenburg. A seat was fitted to an old Jouef skip chassis.
More photos